Whether you’re donating your milk, storing it for your baby, or dropping it off at BoobieJuice, learning how to properly pack frozen breast milk ensures it stays safe, fresh, and effective. Below you’ll find a comprehensive guide on freezing, packaging, and transporting your breast milk, including tips tailored for your BoobieJuice drop-off.
After Scheduling Your Drop-Off
A BoobieJuice Teammate will contact you to confirm your drop-off day/time and go over transportation details. We reserve a one-hour window for drop-off to account for varying travel times and drop-off processing.
Transport Coolers
When preparing your frozen breast milk for transport, selecting the correct cooler is crucial:
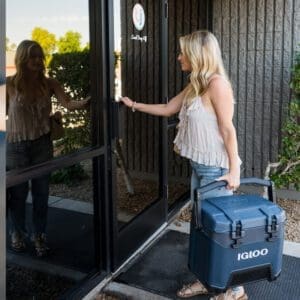
- Hard-sided coolers like Igloo, Yeti, Rtic, Coleman or Orca are ideal for extended trips.
- Soft-walled insulated zipper bags can be used for shorter distances with proper ice layering.
Depending on your cooler, and especially for extended trips over 10+ hours, consider using dry ice to keep the breast milk frozen. Ensure you handle dry ice with care, as it requires specific safety precautions. A BoobieJuice Teammate can help coordinate extended travel arrangements.
If Using a Soft-Walled Insulated Lunch Bag:
- Place gallon Ziploc bags of ice on the bottom of the insulated bag.
- Layer frozen breast milk bags on top of the ice bags.
- Add another layer of ice-filled Ziploc bags on top.
- Do NOT surround breast milk directly with loose ice, as melted water can enter seals and compromise the milk.
Travel Times & Packing Guidelines
Proper preparation depends on how far you’re traveling:
- Under 2 Hours: Milk should be frozen for at least 1 day before transport.
- Over 2 Hours: Milk should be frozen for at least 2 days and packed in a hard-sided insulated cooler.
- 5+ Hours: Please discuss your trip with a BoobieJuice Teammate so we can recommend the best transportation method based on your cooler and milk volume.
On Arrival
If you need assistance carrying in your cooler, please call or text upon arrival. A BoobieJuice Teammate will:
- Assist with weighing the milk.
- Perform temperature checks.
- Complete bag counts.
All milk will be stored in its own individual polycarbonate storage container with your Order Identification Information.
You DO NOT need to leave your coolers or containers—everything will be transferred into our commercial freezers for safe storage.
Should timing change, call or text us at 602-456-1492.
How to Pack Frozen Breast Milk: Step-by-Step Guide
Step 1: Freeze Milk Correctly From the Start
- Use breast milk storage bags that are BPA-free and designed for freezing.
- Avoid overfilling. Most bags hold about 6 oz—stick to 4–5 oz to reduce spill risk or bags breaking when freezing..
- Get all the air out prior to sealing the zipper closed.
- Lay bags flat when freezing to save space and promote faster thawing.
Pro Tip: Once frozen flat, you can stand them up vertically in a storage bin for easy access and transport.
Step 2: Label Each Bag Clearly
- Date and time of expression
- Volume in ounces – it’s best to weigh your milk with a kitchen scale.
- Any special notes (dietary notes, medications, illness etc.)
Use a black permanent marker and write clearly to ensure there’s no confusion later.
Step 3: Pre-Organize Before Packing
- Keep everything neat and compact
- Make bag counting faster at drop-off
Proper storage techniques for expressed milk are crucial to maintain its freshness and quality.
Step 4: Choose the Right Cooler
| Trip Length | Recommended Cooler Type | Notes |
| < 1 hours | Soft-walled insulated bag | Use Ziploc bags of ice on top and bottom to sandwich the milk and keep it frozen. |
| 2–5 hours | Insulated Zipper Tote | Remember to keep the zipper closed. (ie Trader Joes Freezer Bag or Costco Zipper Freeze Bag) |
| 5+ hours | Hard-sided + discuss with us | Depending on distance, gel packs, ice bags or dry ice would be recommended on the top layer.. |
Step 5: Layer and Secure Your Cooler
- Package milk based on the cooler type above with additional ice as needed.
- Organize the milk up blade side down, from left to right. Like looking at a deck of cards from the side.
- Coolers work best when packed nice and tight.
- Additional airspace on the top? Add a few Ziploc bags of ice to take up the additional airspace
- Keep the lids closed tight. Bonus if you have a cooler with latches!
Transportation Do’s and Don’ts
Do
- Freeze milk for at least 24–48 hours before travel.
- Use dedicated breast milk storage bags.
- Pack ice in sealed bags, not loose.
- Package the milk in an appropriate sized cooler.
- Keep your cooler sealed as much as possible.
- Confirm drop-off timing with your BoobieJuice contact.
- Label your milk with clear, legible writing.
- Use freshly frozen breast milk for optimal quality and health benefits.
Don’t:
- Use loose ice—it melts and can leak into your milk bags.
- Transport milk that isn’t fully frozen.
- Leave bags unorganized or loose in the cooler.
- Reuse disposable bags that were not intended for freezing.
- Mix freshly expressed milk with stored milk without proper cooling.
Pro Tips for Long-Distance Transport
- Pre-chill your cooler by adding ice for 1–2 hours before packing.
- If you’re traveling by car, keep the cooler out of direct sunlight.
- Bring a thermometer to check the temperature if you’re unsure.
- Pack coolers tight to reduce air space, which helps maintain temperature.
- Use additional dry ice or gallon ziploc bags of ice and replace the ice as needed.
Storage Upon Arrival
When you arrive at BoobieJuice:
- You’ll be greeted at the door or if you need assistance please call/text on arrival
- Your milk will be weighed, inspected, temperature checked and then stored in its own tagged storage bin in our commercial-grade freezers.
- You take home your cooler—All milk will be stored in our commercial freezers.
With these backing and shipping tips it will help ensure your milk travels to BoobieJuice safely and is kept at optimal frozen temperatures.
Why Proper Packing Matters
Packing frozen breast milk properly is about more than logistics—it’s about protecting the health of your baby. All pouches will be inspected and temperature checks will be performed to make sure your frozen milk is within safely acceptable range. BoobieJuice is committed to the safety and quality of your milk, and by following these packing procedures, you’re helping maintain that standard.
FAQs: How to Pack Frozen Breast Milk
Can I use ice packs instead of Ziploc bags of ice?
What if my milk starts to thaw during travel?
Can I pack different milk storage bag brands together?
Pack Frozen Breast Milk with Confidence
Packaging frozen breast milk is simple and stress-free with a little preparation and the right supplies. The key is maintaining a cold chain, organizing your bags, and preventing moisture from entering the milk containers. Whether you’re on a short drive across town or planning a cross-state trip to drop off your milk at BoobieJuice, we’re here to simplify the drop-off process. Still have questions? Text or call us at 602-456-1492—we’re happy to walk you through your specific travel situation.